Thursday, March 6, 2014

Shamrock Play Dough


This post contains affiliate links. Thank you for your support!

We LOVE play dough! Who doesn't? We especially love making our own because it's a fun way to learn about kitchen math and science! I encourage my kids to participate in making the play dough with me and for the most part they do all the measuring and stirring. And by now, they pretty much know all the ingredients and how much to use. We make a new batch for every holiday and with Saint Patrick's Day coming up, we definitely had to make a batch of green play dough!

To make your own play dough, you will need:
2 cups of plain flour
1/2 cup of salt  
2 tablespoons of cream of tartar
2 tablespoons of vegetable oil
3/4-1 cup of boiling water
Food colouring - gel or liquid
Green glitter (optional) 
Along with a bowl, something to mix with (we used a fork) and a surface to knead the play dough on. 

Please be advised that the food colouring does sometimes stain hands and the surface it is being played on. 

Mix all your dry ingredients together first. Then add the vegetable oil and combine it with the dry ingredients. 


Add your food colouring to the boiling water (we used Wilton's green food colouring gel) and stir it up before adding it to the dry ingredients. This is the part for adults, as young children can accidentally burn themselves on the water. 


Slowly add in the water and stir it until it reaches the consistency you like. You may not need all of the water. You basically want it to be moldable and once it is you'll want to knead it with your hands for a few minutes.


We also decided to add some green glitter and kneaded it in.


Spider-Bean and Munchkin really loved working on their scissor cutting skills (which pairs well with play dough)! They enjoyed cutting off all the shamrocks on the plastic bead necklace so they could use them in their play dough.


They spent a good 20 minutes cutting off each individual shamrock and were actually sad when they ran out... But then I brought out the play dough invitation to create tray!


I added in green and gold sequins (circles and green hearts), shamrock confetti, the shamrock beads and green cut up pipe cleaners, with the ball of green play dough in the middle. We had chosen the light green colour specifically for the play dough so everything else would stand out.


I showed them how to make a clover using the green hearts.


Spider-Bean decided to press the shamrock into the play dough.


Munchkin made a cute shamrock garden.


He poked around the edges and said they were holes. (If you watch Dinosaur Train and are familiar with Don, he's the reason why my son is obsessed with putting holes in stuff.)


That is one tall clover growing out of the shamrock garden!


Spider-Bean used some of the pipe cleaners to create a couple tracks in her clump of play dough.


Meanwhile Munchkin was making shamrock tea. Yum!


He even added a straw.


And pretended to take a sip. Too cute!


I gave them a few simple tools to use, as well, including scissors and plastic pretend play knives.


Mmm, shamrock soup. It looks very yummy!


If you enjoyed this post, follow along with us on Facebook and Pinterest or subscribe by email or Bloglovin'!

Please note: This play dough contains glitter and should not be included in a batch if you intend for it to be "edible" and toddler safe. 

Tuesday, March 4, 2014

Saint Patrick's Day Sensory Bin


This post contains affiliate links. Thank you for your support!

Saint Patrick's Day is fast approaching and we have been enjoying using our felt board to introduce the holiday to Munchkin and Bean. They especially loved the shamrocks and gold coins, so I knew I had to create a sensory bin for them incorporating these two themes. This sensory bin was so easy to set up and they loved playing in it!

We used:
Green scoop (we found ours at Target in the bargain section)
Sensory bin (we used an Anchor glass pan)

I simply poured the green sensory salt into the pan and shook it gently to even it out. Then I lined up the gold coins along the edge of one side, poured the shamrock confetti over the top and finished it off by adding in the green scoop. 


Munchkin was so eager to get to scooping! He does so well with the sensory salt and it is his favourite type of filler for sensory bins! He loved scooping up the gold coins, cleaning them off and exclaiming that they were gold and shiny!


He even put two coins together with a layer of green sensory salt between them and pretended to eat it like a cookie. Too cute!


Bean used the coins as mini scoops and decided to create a salt mountain.


They loved scooping, pouring and finding all the gold coins!


At one point they requested a bowl so they could "hide their treasure". Afterwards we sifted out the salt and counted all the coins they collected.


A simple and fun sensory bin for Saint Patrick's Day!

If you enjoyed this post, follow along with us on Facebook and Pinterest or subscribe by email or Bloglovin'!

Please note: This sensory bin contains plastic confetti and should not be included in a sensory bin for children who still put things in their mouth, as it can cause choking. 

How to Make Sensory Salt


When we first started to make sensory salt, we only made a small batch here and there. And we didn't use it too often. Mainly we just created it as a simple add-on activity for our themed units. We also used them for tracing trays and occasionally for sensory bins. But they weren't very popular. Then for Valentine's Day I created a pink batch that was scented with rose water and my son was just so amazed by it that he literally requested to play in it every day since! I guess now I can say it is a sensory material that he absolutely loves and plays with every day. Because of this I decided to make more batches, in a wide range of colours, so that we can use them for all sorts of activities! 

We used:
Salt (lots of it! we used 26 oz for each colour)
Food colouring gels (we used Wilton's Neon and Pastels) or liquid food colouring (Assorted and Neon)
A bowl and whisk/spoon/fork for stirring
Sturdy Ziploc bags
Plastic gloves (optional, but I find food prep gloves work well)

We used Magenta, orange, teal, purple, pink, yellow, green and blue. And a batch of red that was made last minute with a different brand of food colouring gels (you can definitely tell the difference!).


We also used nine containers of salt (ninth container is not pictured, because I made the red batch last - since I totally meant to make red and not a second batch of magenta, oops!). You should have seen the look on the cashiers face when I bought them all. :)


There are two ways you can make coloured salt. If you need to make it quickly or you are making it with a child (mine happened to be spending the afternoon with Grammy, so this was a surprise for them!), you can pour the salt into a sturdy Ziploc bag, add the food colouring and seal it. Then shake it up real good until all the colour is blended evenly. It may take a few minutes to get it perfect.


The second way is to pour the salt and food colouring into a bowl and stir it up. If you are using liquid food colouring, you may have to add extra, though the colour should spread more easily. I used a generous amount of food colouring gels and the gels will clump, which is why I had the gloves on hand. You don't want to dye your skin, after all. Just knead the salt like you would a batch of play dough. The clumps will all smooth out. 


They will all come out lovely! Here's what pink looks like!


I am excited to see Munchkin's reaction when he gets home and sees how many new batches of sensory salt he has to choose from! I suspect that he will like the purple batch most, since that is his favourite colour.


This is how the salt looks while it is being stirred, before you mix it up using your hands. I want to make a rainbow batch for the kids so they can mix it up themselves and watch all the beautiful colours swirl together and blend!


The teal came out really pretty! I love how vibrant the Wilton gels make the salt!


Sky blue!


Lime green!


Magenta pink!


I ended up adding the old batch of magenta to the new batch. You can see how the new batch is darker because it hasn't dried yet. When they were shaken up and mixed, you couldn't tell them apart. Munchkin will love it when he sees that this batch is now twice as big!


Banana yellow! (I really hope to find a batch of primary colours from Wilton so I can create a dark blue, dark green, bright red and bright yellow batch - although in the meantime I love all of these shades!) And I totally forgot to catch a picture of the orange batch before it got bagged up - forgive me! :)


Look at all of those empty containers!


And here are the lovely sensory salts stored away in Ziploc bags! It just keeps them clean and they are easier to store this way, but you can certainly store them in containers if you have enough available.


And this is the red batch... Sadly I am just not thrilled with the colour, because it isn't as bright as the others. But it still works! (It will make the perfect shade of lava for our dinosaur small world!)


It makes me so happy to see so many new sensory salt options! Though I do believe my son will be even more excited than I am! These will make perfect fillers for sensory bins and I can't wait to create sensory salt small worlds for the kids to play in!


If you enjoyed this post, follow along with us on Facebook and Pinterest or subscribe by email or Bloglovin'!

Monday, March 3, 2014

Motivated Moms Review

Motivated Moms Review

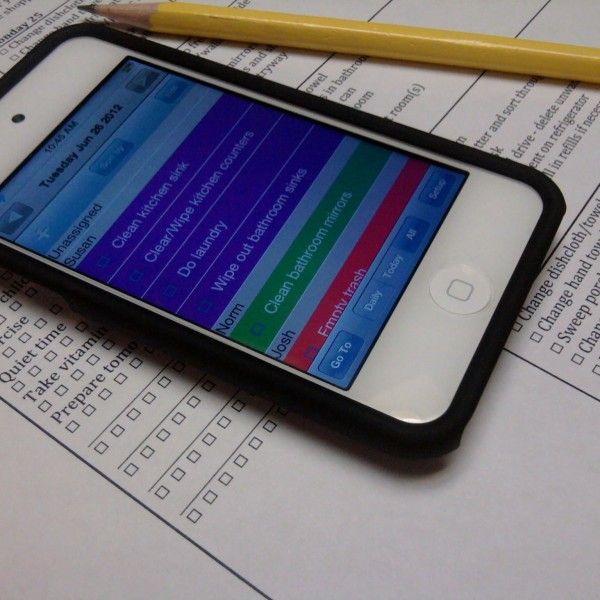
This is a review for Motivated Moms. I received the Motivated Moms iOS App and have been using it now for a few weeks. I use this app on my iPod 5, though it is compatible with iPhone's and iPad's as well (iOS 5.1 or higher). You can also sync the app to any other iOS devices you have, which for us is only the iPod. The app is a version of their popular Ebooks which can be downloaded and printed. The app comes preprogrammed with 2 months of available tasks for $1.99 and for the rest of the year you can pay either $.99 a month or $7.99 for one year. They also have an Android version which I have not tested out. It's an easy process to get set up. All you have to do is download the app in iTunes and then you'll be asked to create an account. Once you do you'll be able to sign in and start using the app. Some neat features of this app include sending chore lists to your email or printing directly from the app.

I like that this app has a set amount of tasks that rotate through the week. That means it doesn't ask me to do the same chores around the house every day and means that I have a set schedule to follow (which I need!). I am admittedly someone who does not focus well and I do chores around the house when I can manage them. Obviously the big chores (dishes, laundry, cleaning up after the kids, etc) are completed daily, but the app also reminds me to do chores I wouldn't necessarily think of. For example "sweep kitchen and entryway" or "wipe out bathroom sinks". Normally I would just think "today I'll clean the kitchen" and then just clean the whole kitchen, which can take hours with two little ones running around needing me every 5 minutes.

The app is also handy to remind me to do these chores in a timely fashion. Now when I check it in the morning, I will see which ones I can get done while the kids are eating breakfast and lunch and plan the rest do while I'm cooking dinner. Doing small chores throughout the day has seriously been saving me time and energy and has made a huge difference. Yes, it doesn't remind me to do everything, but it does have unlimited custom task options, which I haven't added in yet, but plan to. Mainly, I need one that says - clean off cluttered desk. Because lets face it, between blogging and homeschooling, printables and felt projects just pile up on my desk. And my usual go-to option is to just pick it all up and put it in a box and swear to myself that I will get to sorting it out tomorrow. I don't. Impossible. I have the memory of a goldfish (not really!).

Motivated Moms Review

And everything stays organized because after I complete a chore I just check it off the list and that's one less thing for me to do that day. I feel much more accomplished at the end of the day when I see a list of checked off tasks than I do after a day spent trying desperately to get the whole house cleaned. It is just a really easy app to use and keep track of everything. You can even check the next days chores, in case you have free time that day and know you will be too busy for all of tomorrow's chores. I do this mainly on days when I know I'll be spending the next day out of the house.

There are a few tasks that I normally don't use, like planning menus (we don't schedule meals because we prefer to listen to our stomachs and make whatever people want that day). But hey, maybe in a few months I will feel organized enough that planning a menu might work for me! Another similar one is making a shopping or errands list. Well I don't have a car or drive, though my boyfriend does. When he has a day off, that's when we do all of our errands. And the same goes with laundry, since we do not have a washer and dryer in our rented house. So I typically skip over those and just do them on the days we are able. There is an addable option for Bible readings and lessons throughout the year, but we do not use it and that is one that you can remove from the tasks list if it is one you will not use.

This app also allows you to assign chores or rooms to specific people, but since I am the only member of the house that does the chores I had no use for this function. The kids helped me where they could, like changing hand towels in the bathroom and sweeping the floor, which is a chore that my son thinks is amazing. What kid doesn't love brooms? Although he doesn't actually do much sweeping. It is still fun to try and involve them in household tasks so they will grow up to be more responsible about keeping the house clean.

Would I recommend this chore planner? Yes, I would. I know I am not the only mother with a million other things to do during the day. Although I am a stay-at-home mom, there are so many other things that I need to do, between homeschooling my toddler and preschooler, blogging, chores, taking care of the dog and spending time in general with my family. I remember how much tougher it was to get everything done when I was working, though in those days I only had one child. So I know that even working parents would find this app helpful. It has helped me to stay on top of chores so they don't pile up and is a daily reminder to stay focused and make sure I get everything done. Completing the chores here and there throughout the day seems to be what really works for me and is definitely more preferable to an entire day spent cleaning. I look forward to using this app to help establish a better chore routine in the coming year!

~ Social Media links for Motivated Moms ~

And if you are interested in reading more reviews from the TOS Crew on Motivated Moms, click the banner below!

Click to read Crew Reviews
Crew Disclaimer
If you enjoyed this post, follow along with us on Facebook and Pinterest or subscribe by email or Bloglovin'!
Related Posts Plugin for WordPress, Blogger...